1. 源码购买
在 sellmyapp上挑选合适的游戏,支持直接使用 VISA 信用卡购买。
我购买了一个三消类的游戏: Juice Fresh Match 3, 花费 $49。 一般每个游戏的开发者都会提供详细的对游戏进行换皮、接入 IAA/IAP 等操作的文档,我购买的游戏提供的是一份 Google 文档:
sellmyapp 站点也提供了一个通用的 APP 开发、推广、变现的指南:ultimate guide of how to create an app。建议阅读!
2. 游戏编译问题记录
2.1 编译 安卓 版本
1. UnityInAppsIntegration.cs 文件报错
error CS0535: 'UnityInAppsIntegration' does not implement interface member 'IStoreListener.OnInitializeFailed(InitializationFailureReason, string)'
- 解决: 在类中新增了一个成员函数
...

public void OnInitializeFailed(InitializationFailureReason error, string message)
    {
        // Purchasing set-up has not succeeded. Check error for reason. Consider sharing this reason with the user.
        Debug.Log("OnInitializeFailed InitializationFailureReason:" + error + ", message: " + message);
    }

...
2. 编译提示可能存在问题
UnityException: PlayerSettings->Active Input Handling is set to Both, this is unsupported on Android and might cause issues with input and application performance. Please choose only one active input handling.
- 解决:更改 player 设置,使用
Input System Package (New)
1. In Unity Editor, go to: Edit > Project Settings > Player
2. In the Player Settings window, scroll down to "Other Settings"
3. Find "Active Input Handling" and change it from "Both" to either:
    - "Input System Package (New)" - if you're using the new Input System
    - "Input Manager (Old)" - if you're using the legacy input system
4. Save your changes and rebuild your Android project
3. 编译报错:缺少 android build-tools
UnityException: Android SDK is missing build-tools.
Android SDK Build-tools component is not found. Make sure all tools are installed in the SDK manager.
- 解决: 在 UnityHub 中为相应 unity editor 添加 Android build tools。注意这里可能需要多次尝试,开启 VPN 可能有助于成功安装!网上解决方案说也可以安装 Android Studio 后再修改 Unity Editor 中的路径,这边目前没有尝试。
4. 手机安装后,触摸无反应
- 解决:在第 2 步中的解决方案,实际上需要使用
Both
5. 游戏编译过程中报错 “insecure http request is not allowed”,以及游戏运行过程中,可能会提示 Please check internet connection
- 解决:这都是由于在
InternetCheck.cs中通过定期请求一个网址来判断网络是否通。但原来的网址是 http 且访问不稳定,更换为请求https://worldtimeapi.org/api/timezone/Asia/Hong_Kong.txt
2.2 编译 iOS 版本
1. 在 xcode 中编译 iOS-simulator 版本时提示 UnityAds 相关错误
# Building for 'iOS-simulator', but linking in object file (/Users/wallezen/Codehub/github/wallezen/Juice Match 3/build/Frameworks/com.unity.ads/Plugins/iOS/UnityAds.framework/UnityAds[arm64][2](UnityAds-arm64-master.o)) built for 'iOS'
- 解决: 目前没有找到解决方案,暂时在 Player Settings 中把 Target SDK 调整 Device SDK 进行 iOS 端测试。
3. 集成 Unity Ads (编译目标平台为 Android) - 改为接入 Google Admob
参考:https://docs.unity.com/ads/en-us/manual/UnityDeveloperIntegrations
step 1. 在 Unity 平台管理端开启广告功能
登录 https://cloud.unity.com/home/, 找到 Unity Ads Monetization, 然后 enable ads 。
step 2. 安装 Advertisement Legacy pakcage
在 Window → Package Manager → Unity Registry 中搜索安装 Advertisement Legacy, 如果已安装,记得更新到最新版本。 安装完成后,点击 Configure, 跳转到的配置中的 Android Game ID 和 iOS Game ID 都有值就表示配置 ok 了。
注意:这里安装完成后,会有提示同时需要引入 Mobile dependency resolver 的 package, import 就好。这边 import 后,自动执行的 resolve android dependencies 一直失败(Gradle failed to fetch dependencies: java.lang.NoClassDefFoundError: Could not initialize class org.codehaus.groovy.vmplugin.v7.Java7),目前还未解决~, 但广告可以正常展现,先忽略~
3. 集成 Google Admob(编译目标平台为 Android)
参考:https://developers.google.com/admob/unity/quick-start
4. 集成 MMP AppsFlyer(编译目标平台为 Android)
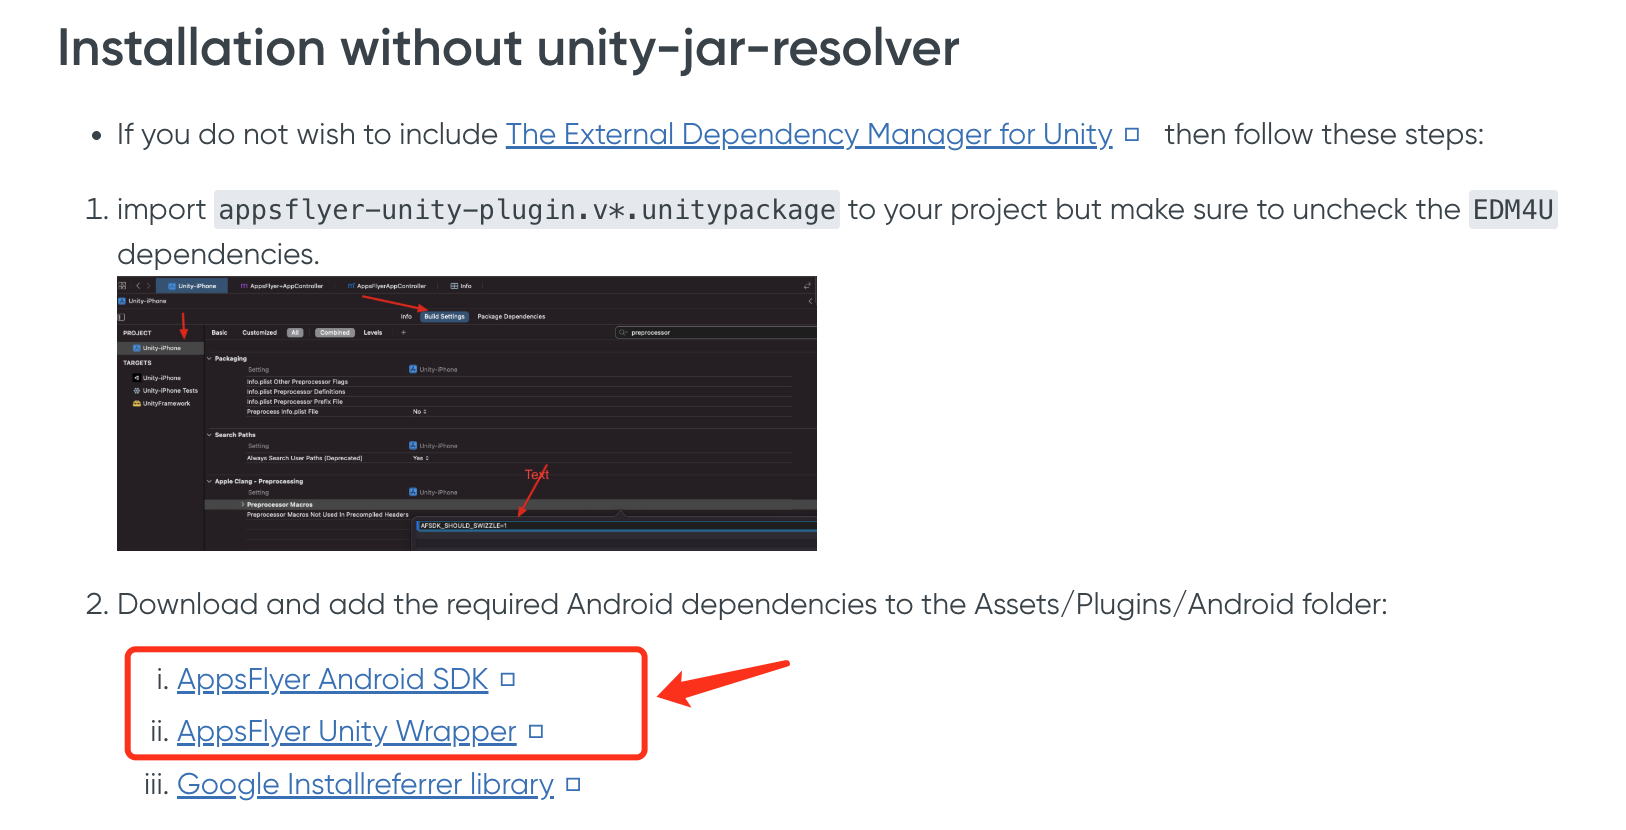
参考:https://dev.appsflyer.com/hc/docs/installation, 执行 Installation without unity-jar-resolver 方案更省事(见问题 1),这样不用执行 step 1 了。
step 1. 安装 Appsflyer package(废弃)
在 Window → Package Manager → install package from git url, 输入:
https://github.com/AppsFlyerSDK/appsflyer-unity-plugin.git#upm
除了安装这个插件,还需要安装相关依赖,但依赖需要手动安装。这个在 appsflyer-unity-plugin 仓库的 README 中有说明。
 安装
安装 EDM4U(external dependency manager): 从 https://developers.google.com/unity/archive#external_dependency_manager_for_unity 下载 unitypackage 包,然后在 unity editor 的 Assets → Import Package → custom package 导入下载的包。
step 2. 创建 AppsFlyer 脚本
在 Asset → JuiceFresh → Scripts 中新建文件 Analytics/AppsFlyerManager.cs
using UnityEngine;
using System.Collections.Generic;
using AppsFlyerSDK;

public class AppsFlyerManager : MonoBehaviour
{
    // Singleton pattern to ensure only one instance exists
    public static AppsFlyerManager Instance { get; private set; }

    private const string AF_DEV_KEY = "Gi7uwtqPwaexQuTjMq8m6Y";
#if UNITY_ANDROID
    private const string APP_ID = "com.hypercgstudio.juicefresh3";
#elif UNITY_IOS
    private const string APP_ID = "6666666666";  // TODO: Add your iOS app ID here
#endif

    void Awake()
    {
        Debug.Log("AppsFlyerManager: Awake");

        // Singleton setup
        if (Instance == null)
        {
            Instance = this;
            DontDestroyOnLoad(gameObject);
        }
        else
        {
            Destroy(gameObject);
        }
    }

    void Start()
    {
        Debug.Log("AppsFlyerManager: Start");

        // Initialize AppsFlyer
        AppsFlyer.initSDK(AF_DEV_KEY, APP_ID);

#if DEVELOPMENT_BUILD
            AppsFlyer.setIsDebug(true);
            Debug.Log("AppsFlyerManager: development mode");
#endif

        // Start tracking
        AppsFlyer.startSDK();
    }

    public void SendLoginEvent(string loginType)
    {
        Dictionary<string, string> eventParams = new Dictionary<string, string>{
            { "login_type", loginType }
        };

        Debug.Log($"AppsFlyerManager: Sending login event with type: {loginType}");

        AppsFlyer.sendEvent(AFInAppEvents.LOGIN, eventParams);
    }

    public void SendLevelCompleteEvent(int level, int score)
    {
        Dictionary<string, string> eventParams = new Dictionary<string, string>
        {
            { AFInAppEvents.LEVEL, level.ToString() },
            { AFInAppEvents.SCORE, score.ToString() }
        };

        Debug.Log("AppsFlyerManager: Sending level complete event");

        AppsFlyer.sendEvent(AFInAppEvents.LEVEL_ACHIEVED, eventParams);
    }

    public async void SendPurchaseEvent(string productId, float price, string orderId, string receiptId)
    {
        Dictionary<string, string> purchaseParams = new Dictionary<string, string>
        {
            { AFInAppEvents.CONTENT_ID, productId },
            { AFInAppEvents.REVENUE, price.ToString() },
            { AFInAppEvents.CURRENCY, "USD" },
            { AFInAppEvents.QUANTITY, "1" },
            { "af_order_id", orderId },
            { AFInAppEvents.RECEIPT_ID, receiptId }
        };

        Debug.Log("AppsFlyerManager: Sending purchase event");

        AppsFlyer.sendEvent(AFInAppEvents.PURCHASE, purchaseParams);
    }

    public async void SendBonusEvent(string bonusType, int amount)
    {
        Dictionary<string, string> eventParams = new Dictionary<string, string>
        {
            { "bonus_type", bonusType },
            { "bonus_amount", amount.ToString() }
        };

        Debug.Log("AppsFlyerManager: Sending bonus event");

        AppsFlyer.sendEvent("bonus_claimed", eventParams);
    }
}
step 3. 编辑 Scripts/LevelManager.cs , 添加事件
...

IEnumerator PreWinAnimationsCor()
{
    ...

    // Add this line to track level complete
	AppsFlyerManager.Instance.SendLevelCompleteEvent(currentLevel, Score);

	...
}

...
step 4. 把 AppsFlyerManager.cs 绑定到 GameObject
我们目前绑定到了 EventListener。
step 5. 添加 AppsFlyer 需要的权限(废弃)- AppsFlyer 插件会自动添加
在 Edit → Build Profiles → Player Setting → Publishing Settings → Build 中勾选 Custom Main Manifest, 然后在新增的文件中添加:
<?xml version="1.0" encoding="utf-8"?>
<manifest
    xmlns:android="http://schemas.android.com/apk/res/android"
    xmlns:tools="http://schemas.android.com/tools">
    <application>
        ...
    </application>

    <uses-permission android:name="android.permission.INTERNET" />
    <uses-permission android:name="android.permission.ACCESS_NETWORK_STATE" />
    <uses-permission android:name="android.permission.ACCESS_WIFI_STATE" />
    <uses-permission android:name="com.google.android.gms.permission.AD_ID" />
</manifest>
问题记录
- 发送事件函数有被调用,但就是在 AppsFlyer 管理端看不到发送的事件,有可能出现以下错误:
Unity AndroidJavaException: java.lang.ClassNotFoundException: com.appsflyer.unity.AppsFlyerAndroidWrapper
- 解决:尝试了 Assets → Mobile Dependency Resolver → Android Resolver → Force Resolve, 但无效(resolve 失败)。后来参考 appsflyer integrate docs中的下图所示内容,将红框中的两个包下载后放到对应目录,这样就解决了。(是不是可能一开始就使用下图中的安装方式更好?就不用安装 EDM4U 这些了?)
-
在 AppsFlyer 管理端添加测试设备时,手动添加有可能添加的设备 ID 其实不一定能够被获取到(比如通过
*#06#看到的 IMEI 不一定能被 unity 应用获取到)。最好通过下载My device id by Appsflyer应用来添加。在这个应用中可以看到在测试设备上能够获取到哪些设备 ID,然后添加对应的设备 ID 就好。详情参考:https://support.appsflyer.com/hc/en-us/articles/207031996-Registering-test-devices -
[FIXME]在测试设备上测试不能显示广告,查看日志在广告初始化报错信息:
Error Unity java.lang.ClassNotFoundException: com.unity3d.services.banners.IUnityBannerListener
- 解决:可能是由于安装了 EDM4U 导致(没安装之前没有验证~),但按照 方案中的勾选 Player Settings → Publishing Settings → Build → Custom Main Gradle Template 后,反而导致编译失败,问题尚未解决~。- 待尝试使用推荐的 Ads Mediation package。
- 进展更新:重新在一个没有安装 EDM4U 的项目中 也就包同样的错。因此不一定是 EDM4U 导致的问题。
- [FIXME] 使用 EDM4U resolve dependencies 时 报错:
java.lang.NoClassDefFoundError: Could not initialize class org.codehaus.groovy.vmplugin.v7.Java7
- 解决:参考 https://n2kz.hatenablog.com/entry/2020/04/29/214204, 但没有解决~
附录. 如何在手机调试测试 Unity 应用?
- 在手机上启用开发者模式+USB 调试模式,连接手机与mac(连接时选择 管理文件 选项),在 unity 的 File → Build Profiles 中正常就可以看到手机设备,然后勾选上
Development Build和Scripting Debug,最后点击Build and Run.。这样就能自动在手机上安装运行 App。 - 为了查看 App 在手机运行过程中的日志信息,需要在 Window → Package Manger 中选择
unity registry中搜索安装Android Logcat。安装完成后,打开 Window → Analysis → Android Logcat 就能查看 App 在手机运行过程中的日志信息。